What is a Welding Symbol & its meaning?
Welding Symbols are used to indicate desired welding & brazing details on the fabrication drawings. The welding symbol is a graphical representation that is used to give the design requirements to the shop in a concise manner.
For E.g. a symbol can be used to specify the weld type, groove design, welding process, face & root contour, weld length, throat size, and other information.
Basic welding Symbol (Primary Weld)
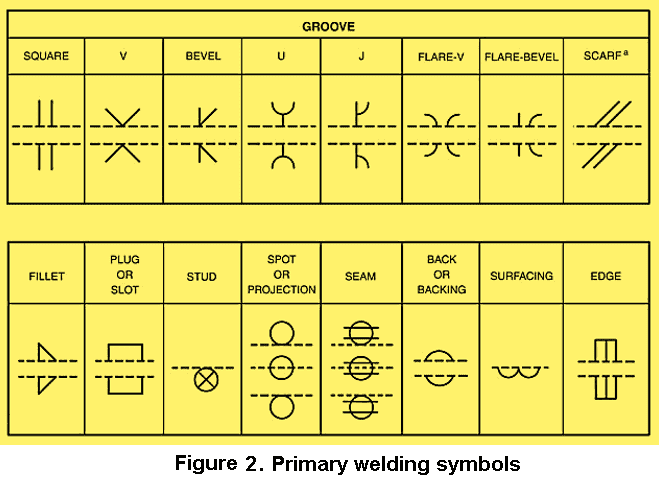
The terms welding symbol and weld symbol have different meanings. A weld symbol indicates the required type of weld (Sqaure, bevel, V, or fillet for example) as shown in the below picture. These are called primary weld symbols.
AWS Welding Symbol Chart (desk Size)
AWS Welding Symbol Chart (Wall Size)
On the other hand, the welding symbol is constructed using the basic weld symbol and additional supplementary information. An example of a welding symbol (in this case a fillet weld) is given in the below picture:
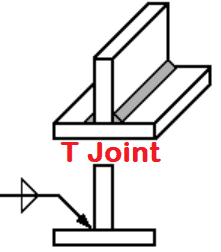
Please remember that the all welding & brazing symbols have a minimum of three basic elements:
- A Reference Line
- An arrow line &
- a Tail
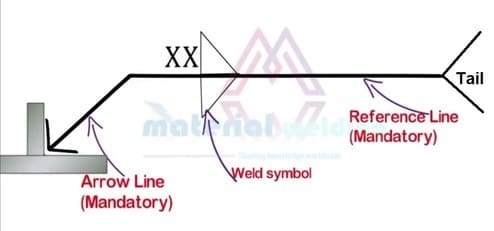
As shown in the above figure, a reference line is always horizontal and the arrow line is inclined to the reference line at one end. The angle of inclination of the arrow or whether it is pointing upwards or downwards has no importance.
Check out the below post for detailed explanations of Basic welding symbols, and their types with examples.
The main parts/ elements of the Welding Symbol
A complete Welding symbol may consist of additional information apart from the 3 main elements listed above. So, a welding symbol can have the following elements:
- A reference Line
- An arrow
- A tail
- Basic weld symbol
- Dimensions and other data
- Supplementary symbols
- Finish symbol
- Specification, welding process, or other references for additional information is given in the tail section.
Welding Symbol Reference Line meaning
The welding symbols are placed on a horizontal line that is connected to the arrow line pointed at the place of weld. This horizontal line is called Reference Line. The tail of a welding symbol if used is connected to the other end of the reference line as shown in the below picture.

In this example, a weld symbol reference line comparison is given for ISO 2553 & AWS A2.4 welding symbol. The AWS A2.4 uses only one solid reference line while the ISO 2553 uses two horizontal reference lines- solid & dotted.
All the weld symbols, weld sizes, pitch, weld length are placed on the reference line. The placement of these weld symbols on the reference line further elaborate about the welding directions- Arrow side, or Other side, as explained further in this post.
Welding Symbol for Fillet Weld
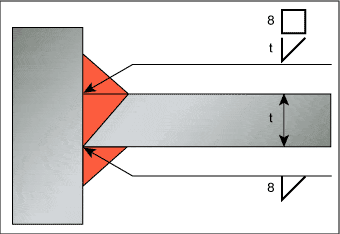
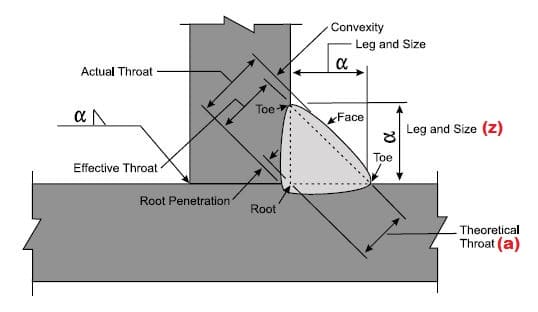
The fillet weld symbol is represented by an insolence triangle placed on the reference line. The weld size (Leg length or throat size) is always given on the left side of the triangle while the nos. of weld or weld length is given on the right side of the weld symbol.
In the below example, fillet weld symbol as per ISO 2553 and AWS A2.4 are shown.
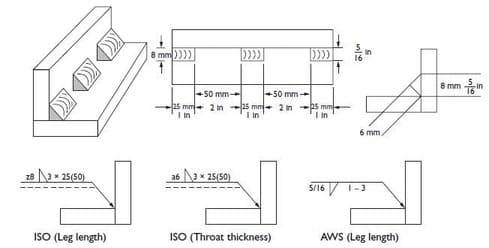
Welding Symbols on blueprints
Welding symbols on blueprints aid the welders, inspectors, and engineers in the welding requirements for a welded part.
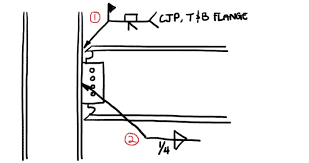
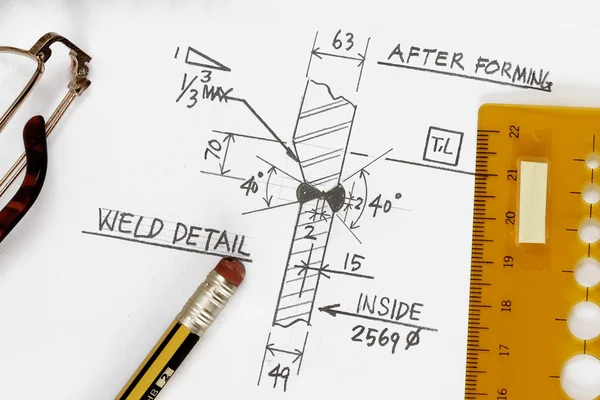
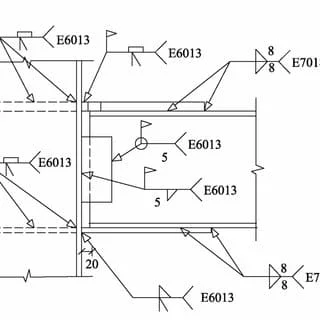
Most of the fabrication blueprints in the USA follow the AWS A2.4 welding symbol standard although some fabricators use shorthand codes or descriptive information by highlighting the area of interest. The below welding blueprint example uses welding symbols according to AWS A2.4.
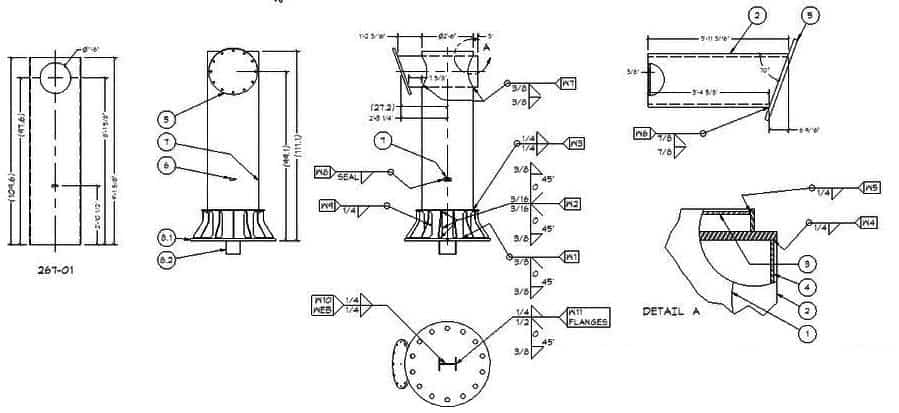
An example of a welding blueprint is given in the below picture for reference. Here descriptive information is given by an arrow line for required weld details.
Meaning of Welding Symbol Arrow Side
What is CJP, PJP weld meaning, symbol, differences and examples?
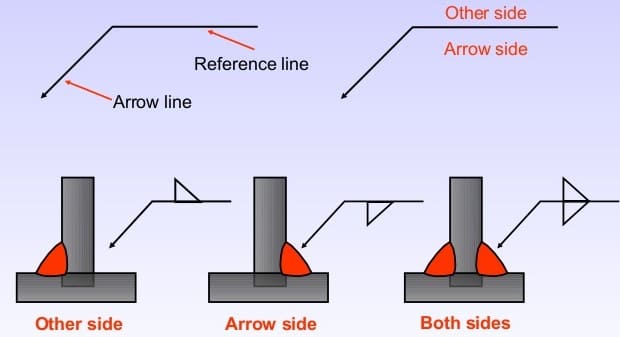
The reference line of a welding symbol has two sides i.e. the arrow side and the other side. on a fabrication drawing or blueprint, the arrow point to the location of the weld. Many times it is not possible to point the arrow on the same actual side of the weld. Hence, two sides of the reference lines are used to specify the welding location as:
- Welding on arrow side &
- Welding on another side
When the welding symbol is used for welding on the arrow side, the weld symbol (triangle, V or Y) is placed below the reference line as shown in the below figure.
Meaning of Welding Symbol other Side
The Welding symbol for the other side means the welding has to be carried out on the other side of the arrow line. The weld symbol is placed above the reference line on the welding symbol as shown in the above figure.
Any welding instructions on the other side of the reference line apply to the opposite side of the part.
Welding Symbol Auto Cad
in the Auto Cad application, Welding symbols are added via the Mechanical Toolset option. AutoCAD Mechanical toolset has an inbuilt library for welding symbols to comply with AWS A2.4, ISO 2553, GOST 2.312-72, ISO 4063, and many more drafting standards. You can create your own symbols in the Library to use later.
How to insert Welding Symbol in Auto Cad:
To use welding symbols in Auto Cad. Open the Auto Cad application.
Choose & click Annotate Tab Symbols panel
  Welding Symbol drop-down menu. This will show the welding symbols saved in the Auto Cad Library and gives the user ability to insert welding symbols directly from Library to the drawing/ blueprint.
Watch this video for inserting Welding Symbol in the Auto Cad application.
The details about Welding Symbols use in Auto Cad are provided by AutoDesk in this post.
Welding Symbol Standards
Welding Symbols are an integral part of a Fabrication Drawing or Blueprint and are being drafted based on specific standard & specification requirements- guidelines. The main Welding Symbols standards used are:
- AWS A2.4: 2020 Edition
- ISO 2553: 2019 Edition
- BS EN ISO 4063:2009 Edition
- GOST 2.312-72: Russian Standard for Welding Symbol
- GB 324- 88: Chinese Standard for Welding Symbol
- DIN EN 22553
All of the above welding standards are used around the globe & have their own territorial applications. The use of these symbols on the blueprint/ drawing is dependent on the job & specific country/ client requirements.
AWS & ISO 2553 Welding Symbols
The Welding symbols are specified in the ANSI/AWS A2.4 standard. Thie standard also covers brazing and non-destructive symbols & their uses.
Welding symbols for fillet, groove, slot, plug, spot, stud, and many other types are covered in this standard. AWS A2.4 standard is predominately used all around the globe and used in the USA, Canada, the gulf, and Asian regions.
ISO 2553 Welding symbol standard is mainly used in Europe, the United Kingdom, Australia, and India.
Many other countries also use ISO 2553 where the fabrication requirements have to comply with the ISO construction standards such as EN1090, EN 15085, and ISO 3834 quality requirements for example. The below post explains the main differences between the ISO 2553 and AWS D1.1 standards for welding symbols.
Melt-Through Welding Symbol
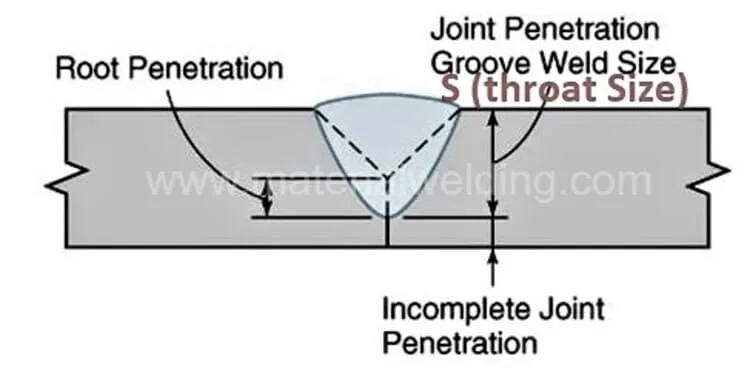
Melt-through welding symbol are applicable for welding joints that require complete joint penetration (CJP) weld. The root penetration of melt through will be visible from the root side when welded only from face side.
An example of a melt through weld symbol is shown below considering a square butt joint configuration.
The melt-through symbol is placed opposite (other side) to the main weld symbol.

Stud Weld Symbol
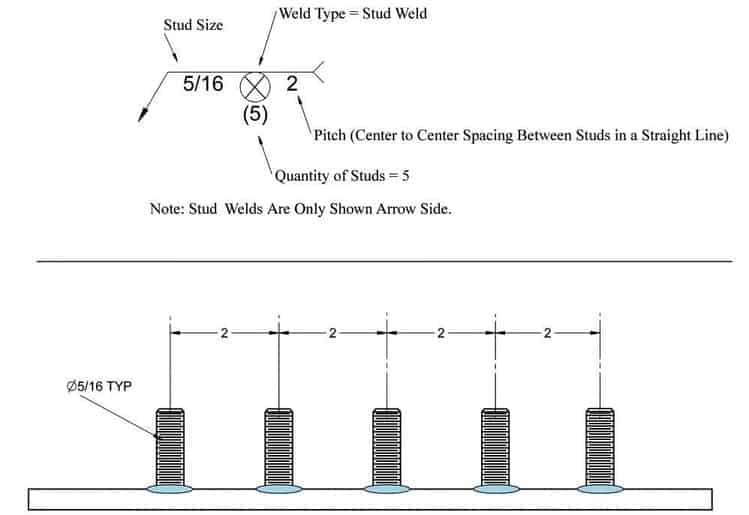
The stud weld symbol is used to define the stud welding requirements. Stud welding symbol consists of stud weld symbol as a crossed circle. In a stud welding symbol, the weld symbol is always put on the arrow side and there is no other side symbol for stud weld.
An example of a stud welding symbol is given below. The stud size 5/16 is placed on the left side of the weld symbol while pitch length is specified on the right side. Any additional information regarding the WPS and the specification shall be given in the tail section.
Welding Symbol for Seam weld
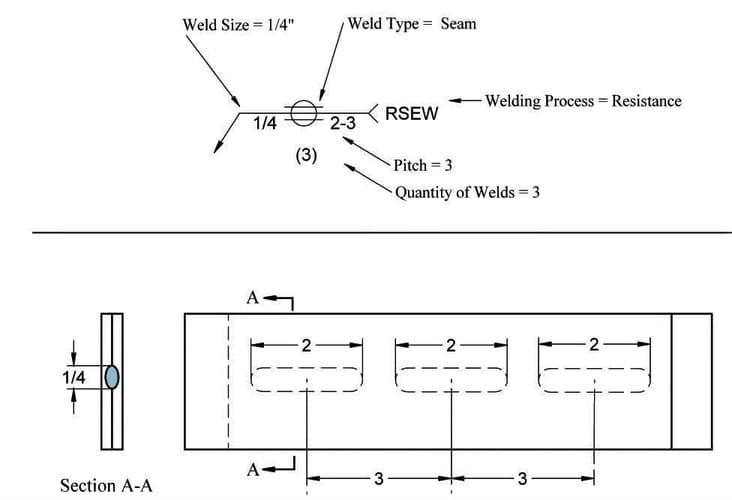
A seam weld joint is made between two faying surfaces using a lap joint configuration. Seam Weld symbol is a no arrow or other side significance welding symbol. So it can be quite confusing and it is considered an advanced welding symbol.
The supplementary weld symbols placed on the seam weld symbol in a complete welding symbol however can guide the welding side. A seam welding symbol is similar to other welding symbols but the welding process has to be specified in the tail section.
Seam weld size is placed on the left side of the welding symbol and pitch is specified on the right side as shown in the below example using the resistance seam welding process (RSEW).
Welding Symbol for Projection & Spot Weld
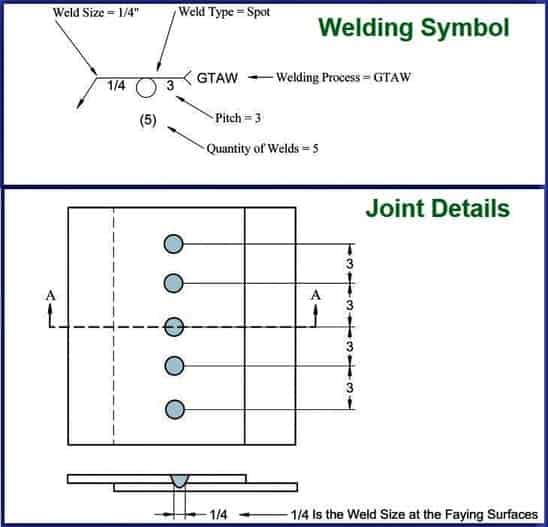
A spot weld symbol can be placed as an arrow side, other side, or straddle the reference line where it means no side significance. The below welding symbol for a spot weld shows a weld on the arrow side. The spot weld size is 1/4 inches, with 5 numbers spots at a pitch of 3 inches using the GTAW (TIG) welding process.
The same welding is used for the projection weld joints. But compared to seam weld, projection weld symbols are only for arrow side, or other side welds.
Welding Symbol for Weld All around or Peripheral Welds
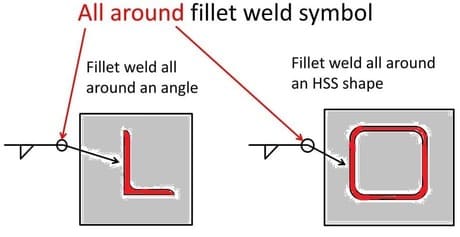
The all-around (Peripheral Welds) welding symbol is used for continuous welds made at the peripheral of a welding joint. The all-around weld symbol is used for weld joints that require a complete weld on its full periphery. Examples of a fillet weld made all around are given below.
Surfacing (weld built-up/ buttering) Welding Symbol
The surfacing welding symbol consists of 2 half-circles placed on the reference line, weld size (height of weld on base metal), and any supplementary weld symbol for surface finish. The direction of the surfacing if applicable such as circumferential or longitudinal weld direction.
In the below-surfacing welding symbol, a surface weld of 1/2 inch height is placed on the arrow side and requires surface finishing by machining. The weld deposit direction is circumferential.

Welding Symbol for Edge Weld
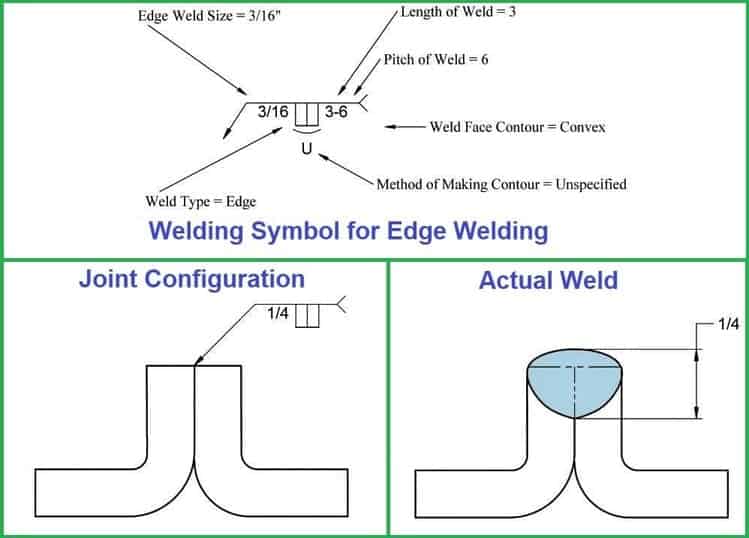
The edge welding symbol consists of two rectangles placed on the arrow side. The example of an edge welding symbol is shown in the below example.
If the edge weld size is given in the welding symbol, it means the depth of weld penetration. E.g. 1/4 inch here in this example refers to the depth of penetration of this edge joint.
Welding Symbols for Spacer Weld
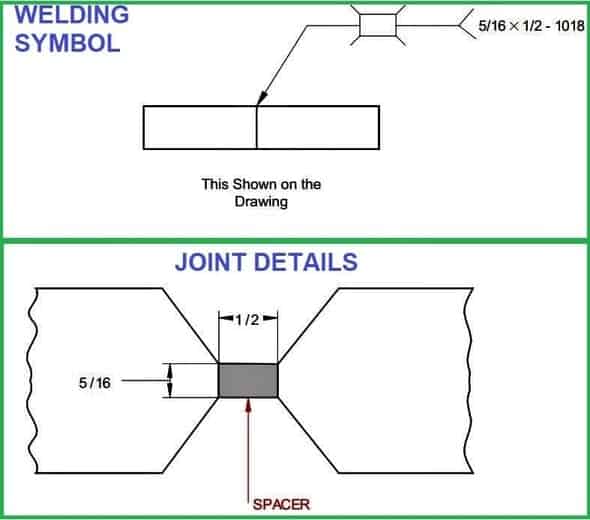
Spacers are the inserts used in the welding joint to provide a uniform root gap. Some welding spacers are designed to provide free expansion at the weld root thus reducing the weld cracking in crack-prone materials.
The welding symbol for spacer consists of a rectangle that straddles the reference line as shown in the below example. The dimensions of the spacer are mentioned in the welding symbol tail.
Welding symbol for site (field) weld
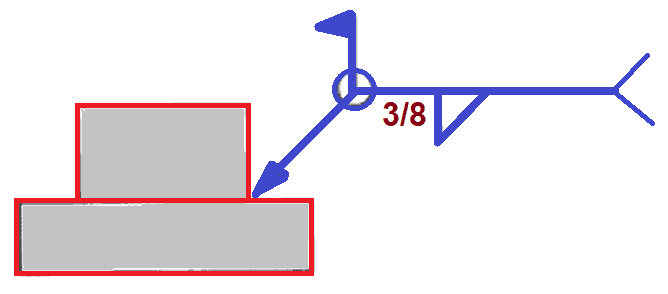
A field weld symbol is a flag shape attached to the vertical line. Field welds are made at the erection site, and not in the fabrication shop.
Field Weld or Site Weld symbol consists of a flag shape weld symbol that is always placed above the reference line at its junction with an arrow line end pointed away from the arrow towards the tail as shown in the below example.
Welding symbol for stitch welding (Intermittent Weld Symbol)
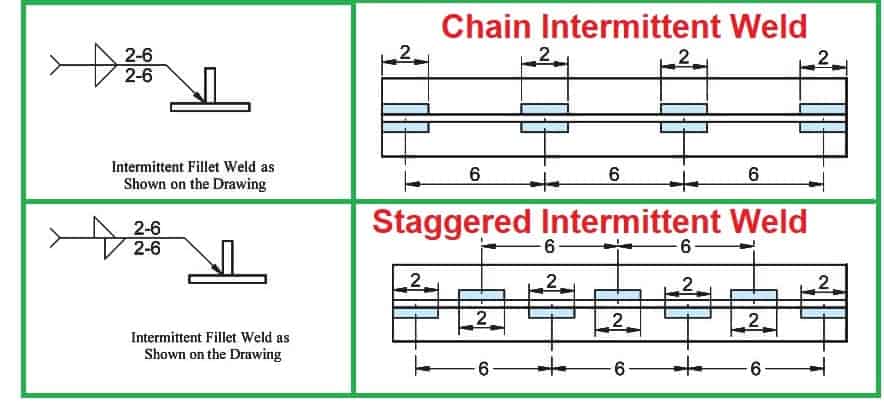
Stich Weld means intermittent welds placed on a welding joint with gaps between the welds. A stitch weld or Intermittent weld consists of a weld symbol (e.g. a filet weld in the below example), weld size, length of the weld (e.g. 2 inches), and the pitch (6 inches in the below example).
Stich Welding is Also called Skip welding and they are mainly used to control the welding distortion, especially in sheet metal welding. They are placed in three different ways:
Related article: Types of Welding sequences
- Intermittent Weld: Stich welds are placed only on one side of the joint.
- Chain Intermittent Weld: Stich welds are placed on both sides of the joint.
- Staggered Intermittent Weld: Stich welds are placed on both sides of the joint by offsetting each other weld.
Welding Symbol for Back & Backing Weld
The weld symbol for the back ad backing weld is the same. The difference is based on the weld bead placement. When we say Back Weld it means the welding is done on the reverse side of the weld joint after finishing the weld on the face side. For example, complete welding of single ‘V’ and welding a run after that on the root side.

A Backing Weld is opposite to a back weld. The backing weld means the weld is deposited before making the main weld.
For example, in the case of a groove weld, a weld run is made on the root side before filling the groove. The welding symbols for Back weld & Backing weld as per AWS A2.4 are shown in the above picture.
Welding Symbol for Backing Strip or Backing
Backing Strip (Backing) is different than the back or backing weld. The welding symbol for backing or back strip is the same in AWS A2.4 & ISO 2553 although they use different identification (R in AWS A2.4 & MR in ISO 2553) as shown in the below symbol.

The backing/ Back strip weld symbol is placed on the opposite side of the main weld symbol. E.g. in the above example, the backing strip symbol (rectangle) is placed opposite the side of the ‘Single V’ weld symbol.
R means, that the backing/ backing strip is a removable type. If a symbol without ‘R’ means a permanent backing type.
