What is in ASME Section IID
ASME BPVC Section 2-Materials-Part D-Properties or BPVC-IID (Customary) -2021 is part 4 of the ASME Section II series. ASME Section 2, Part-D is used by the ASME construction code.
This part gives detailed mechanical properties (such as Tensile strength & yield strength (allowable design), external pressure chart and physical properties for materials in a tabulated format.
Today in this post, I try to explain how to find the allowable stress required for calculation in ASME Section II-Part D.
Obtaining ASME Section I Allowable stress
If you look at the strength calculation formula in Section I, it is the allowable stress that does not fall out. The symbol is written as “S” and in English, it is called Maximum Allowable Stress Value, and it is instructed to use Table 1A of Section II Part D.
However, for beginners, it is quite cumbersome. I can’t even understand Section I, did you see Section II? So I prepared. Just follow this.
First, let’s take the material and temperature as an example as follows.
Material: SA-106 Grade B (Carbon Steel Seamless Pipe)
Design Temperature: 360 C
In Part D of Section II, Customary (US) units and Metric (S I) units are prepared separately. We use metric units.
Find Table 1 A in ASME Section II. Prepare Part D of ASME Section II. (If you can’t get it right now, you can get it later and read it along with this article. First, focus here.) ASME Section II consists of Part A to Part D. Among them, we only use Part D.
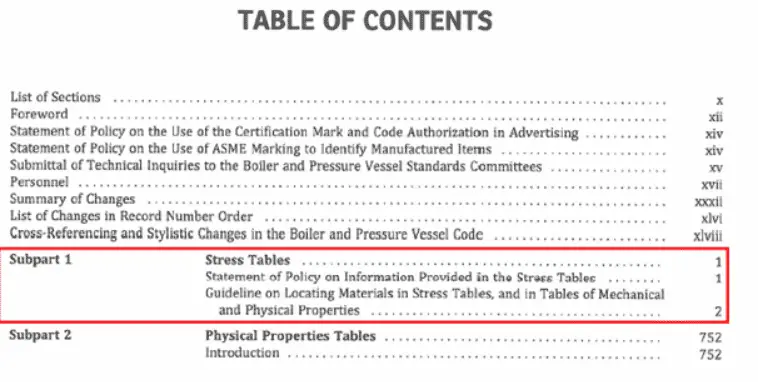
First, if you look at the Table of Contents, there is a part of Subpart-1 as shown in the below picture, and here it is indicated as a Stress Table.
If you go through a few more pages of the table of contents, you can see a section called Tables that show the table of contents.
If you look here, you can see that Table 1A is from page 6 to page 161 as shown below.
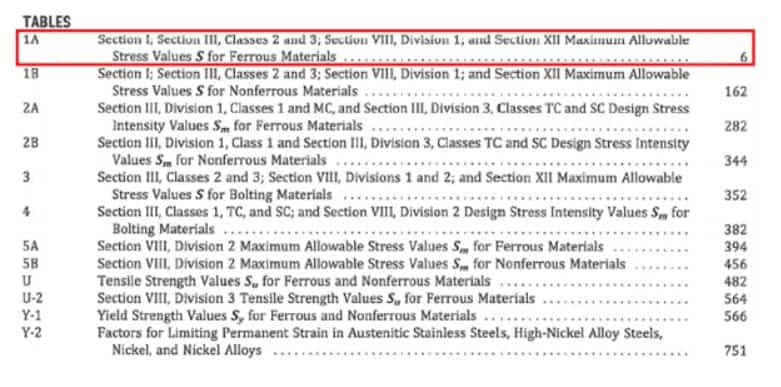
(There are several tables, but we only care about Table 1A.). We go to page 6, the first chapter of Table 1A. Refer to the below picture. Find the material we are looking for (SA-106B) in Table 1A.
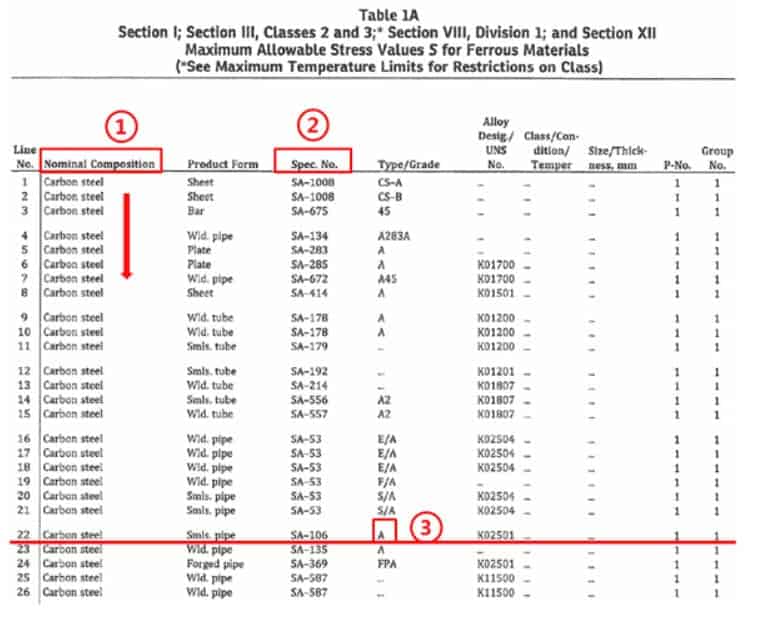
Step- 1.
Here, we should pay attention to Line No. Next is the Nominal Composition column. Materials in Table 1A are listed in order of carbon content and alloy content from least to most, starting with Carbon Steel.
The SA-106 Grade B we are looking for is carbon steel, so you can find it in the Carbon Steel section. The materials start from carbon steel to increasing alloying content.
so it is very helpful to know the composition of the material we are looking for first.)
Step. 2
Spec. in the 4th column of the table in the figure above. No. Looking down, look for SA-106. if you look at line 22, there is SA-106, and the grade is A, so I will skip it. (The grade is lower than the material we are looking for.) After a few pages, we find SA-106 Grade B on page 14 as shown below.
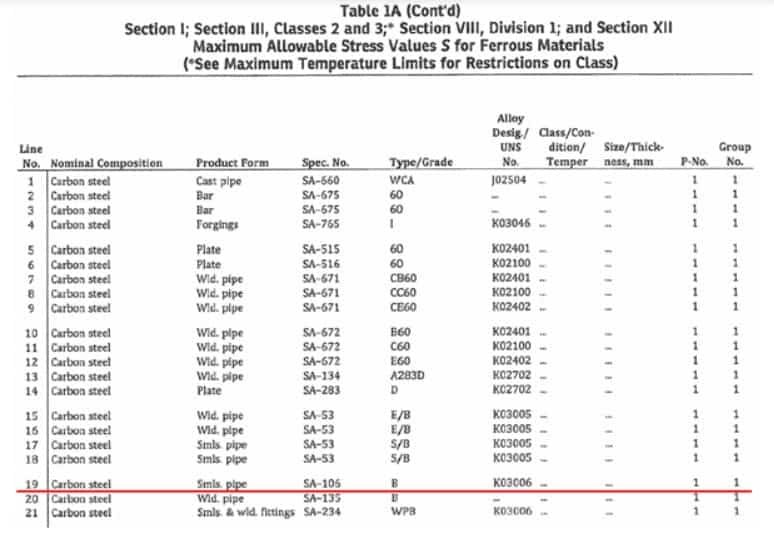
(For reference, if you check the P-No. column, you can see that P Number is 1.)
Find the allowable stress of the material we want (SA-106 B). While checking Line No. 19, move on to the next chapter, page 15, as shown in the figure below.
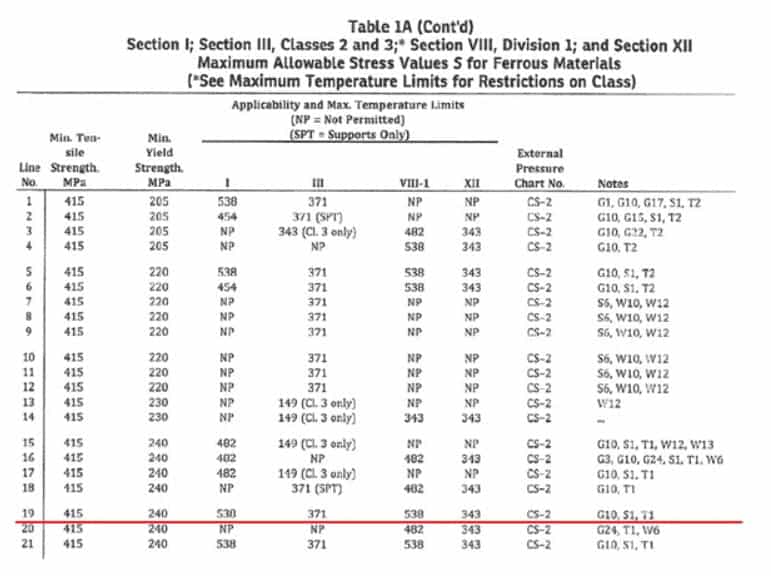
If you check line 19, you can see that the minimum tensile stress of SA-1 06 Grade B is 415 MPa and the minimum yield stress is 240 MPa. ( Based on room temperature ).
Also, the maximum applicable temperature in Section I is 538 degrees C. If it says NP (Not Permitted) in the code, it means that it cannot be applied.
Now we move on to the next chapter, page 16, as shown in the figure below to check the allowable stress at the design temperature.
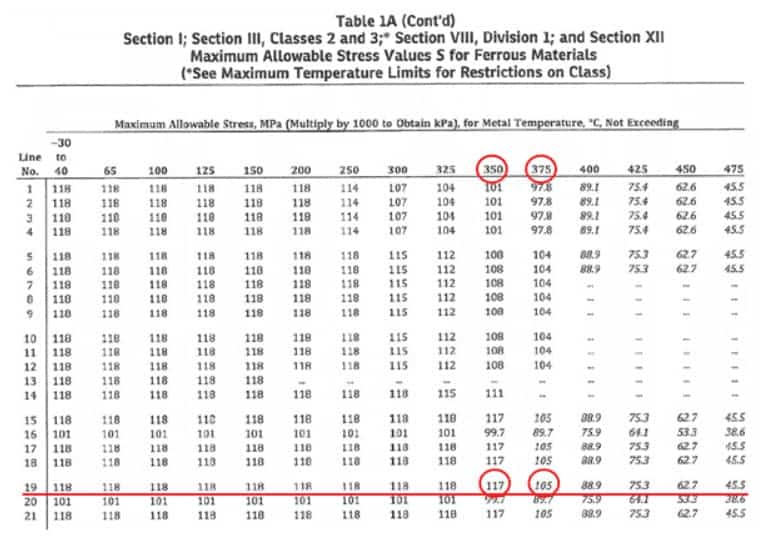
At the design temperature of 360 degrees C, the allowable stress value we are looking for is not shown.
Therefore, after checking the allowable stress of 117 MP at 350°C and the allowable stress of 105 MPa at 375°C, calculate the allowable stress at the design temperature of 360°C using interpolation to obtain the allowable stress of 112.2 MPa.
When using electronic documents
These days, there are many cases of having ASME Code in the form of an electronic document, so if you have Section II as a PDF file, you can find the allowable stress value more easily as follows. After opening the Section II file, use the search option.
In the search bar, type ‘SA-106’ and press search.AII sentences containing these are displayed.
(Table 1A is mainly located at the top .)
- Check the grade while pressing the sentences sequentially from the top to ‘ Grade B’ At the same time as finding, confirm that it is Table 1A.
- After that, the method of finding the allowable stress value for the temperature is the same as the method described above.
Interpolation calculation
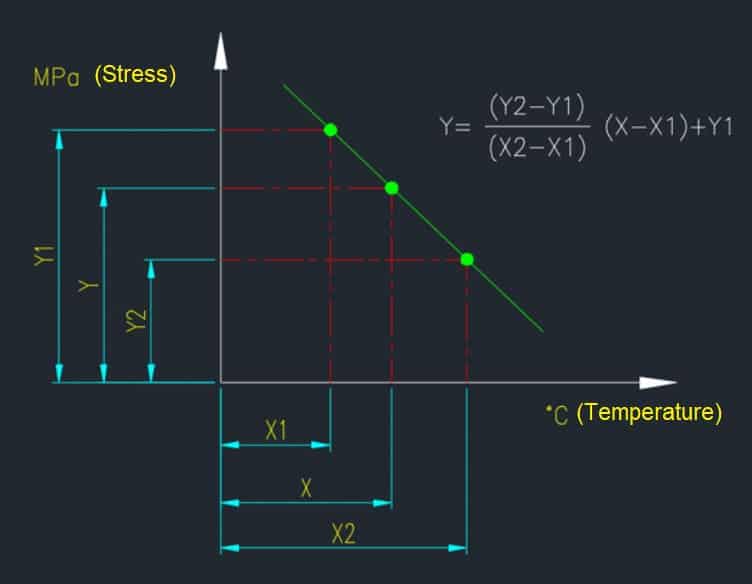
Interpolation is a method to find the required value between the given values, and it is obtained by
referring to the following figure.
Here,

Y is calculated using the given values, it becomes 112.2 MPa. This concludes the explanation of how to find the allowable stress used in strength calculation in ASME Section I in ASME Section II Part D.
For reference, in ASME Section II Part D, you can check most of the properties including allowable stress, yield strength, and tensile strength for all materials used in Section Ill and Section VIII.
