Testing for weld overlay procedure qualification
Based on the qualification code or standards, the mechanical testing shall be performed as specified in BPVC ASME IX, ISO 15614-7, ISO 10423, ISO 15156, and according to supplemental requirements if applicable in the client specification.
These supplement requirements are such as additional corrosion tests, ultrasonic testing of the weld deposit or could be bond testing et cetera to name a few but not only limited to these.
Click to learn about the Welding Procedure qualification tests for weld overlay qualification.
What is weld overlay or weld cladding
Clad or Cladding is the application of the weld metal overlay (E.g. CRO or hard facing) or bonded corrosion-resistant alloy added to the base metal (substrate) surface.
The deposition is carried out using various welding processes. The cladding is a non‐standard term, used in ASME Section IX, for surfacing.
Corrosion resistant overlay (CRO) vs. Hard-facing overlay (HFO)
Corrosion‐resistant weld overlay (CRO) is the deposition of one or more layers of weld metal to the surface of the base material in an effort to improve the corrosion resistance properties of the surface.
The weld overlay is deposited above the base material (substrate material) thus this does not serve increase in material thickness for strength purposes.
While hard‐facing weld overlay (HFO) is the deposition of one or more layers of weld metal to the surface of a material in an effort to improve the wear resistance properties of the surface.
Weld overlay procedure testing requirements as per ASME Section IX.
ASME Section lX in addition to covering various processes also specified the rules for procedure qualification of corrosion-resistant weld metal overlay (CRO) and hard-facing weld metal overlay (HFO).
The requirements for CRO are given in the ASME Section IX, clause QW-214. For Hard‐facing weld metal overlay requirements are specified in clause QW 216.
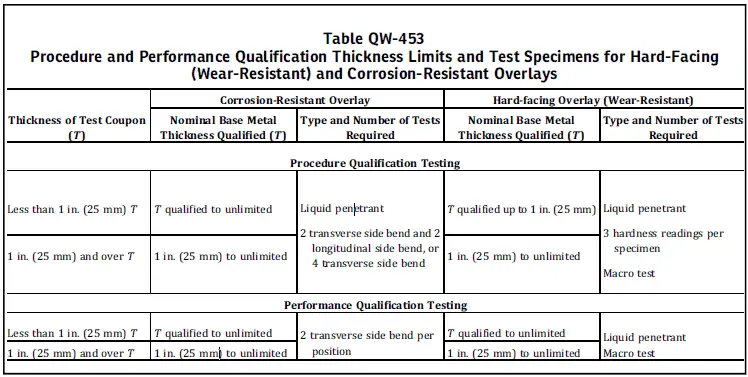
The test requirements for WPS qualification are given in Table QW-453. (Explained further in this article).
Welding variables for corrosion resistant and hard-facing overlay
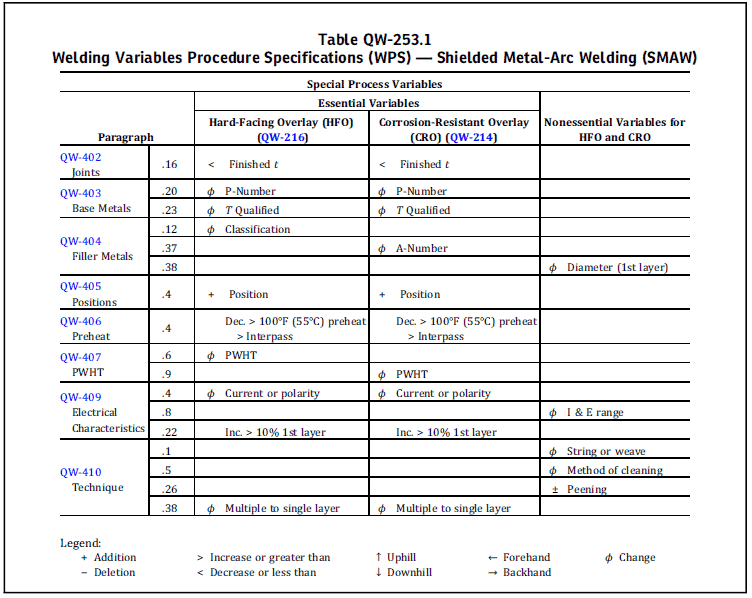
CRO and HFO are considered as the special process in ASME Section 9. So essential variables for corrosion‐resistant and hard‐surfacing weld metal overlays are as indicated as a special process in the QW-250.
Usually, you can find these variables for each welding process after the essential, no-essential, and supplementary essential variables table for welding processes.
When qualification is required for CRO or hard-facing, the welding variables listed under special process are applicable for procedure qualification (PQR) or performance qualification (WPQ).
Any variation in the corrosion‐resistant overlay (CRO) or hard‐surfacing (wear resistance) welding process shall require requalification of the WPS-PQR.
In the below table, examples of special process variables for the SMAW welding process are given.
Essential variables and supplemental essential variables as specified in ASME IX (Sec. QW 253.1, QW254.1, QW 255.1, QW 256.1, or QW 257.1 as applicable for the selected welding method). shall apply as a minimum.
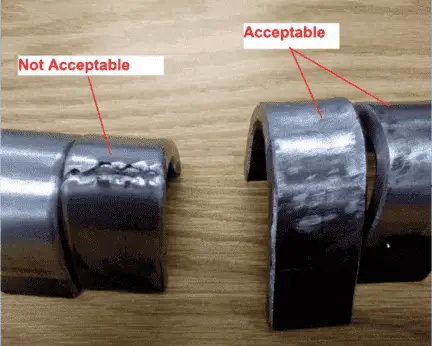
Acceptance of Weld overlay as per ASME Section IX
Acceptance for Bend Test:
Four guided transverse side-bend tests shall be made from the test coupon for the qualification, or 2 transverse side bends & 2 longitudinal direction side bend tests can also be used in lieu of 4 side bend tests.
For the acceptance of the bend test for CRO, the bend specimens after bending shall show no open flaw more than 1/16 inches (1.5 millimeters), found in any side.
Further, no open flaws more than 1/8 inches (3 millimeters) shall be allowed close to the weld area.
Bend test requirements are specified in ISO 15614-7 Sec 7.4.4 if qualification is according to the ISO Standard.
What is Bend Test in welds, & Types of Bend Test?
Acceptance of Liquid Penetration Testing: Liquid penetrant testing given in the QW-214 clause of ASME Section 9 for CRO or corrosion‐resistant overlay is required to meet the acceptance & other requirements as given in the ASME Section 5.
Article 6. For penetrant testing result, the acceptance criteria of QW-195.2 is required to be fulfilled.
PWHT if used during welding procedure test, shall be completed before final NDT. API 6A PSL3 Sec 7.5.2.2.9 & 7.5.2.3.8) specify the LPT requirements for Weld overlay procedure qualification.
Test requirements for weld overlay
Mechanical test requirements for weld overlay procedure qualification are given in the ASME Section IX, QW 453. QW-453 also lists the test requirements for welder performance qualification for weld overlay applications.
The types of mechanical & non-destructive test requirements for weld overlay qualification are given in the below table.
Hardness testing of weld overlay procedure test as per ISO 15156-2
Hardness testing shall be carried out by the Vickers 10-kg or 5 kg method in accordance with ISO 6507-1 I ASTM E 92.
Hardness testing shall additionally be carried out by the Rockwell method in accordance with ISO 6508-1 I ASTM E 18.
if PWHT is performed on the welding procedure test piece.
What is hardness & types of Hardness tests?
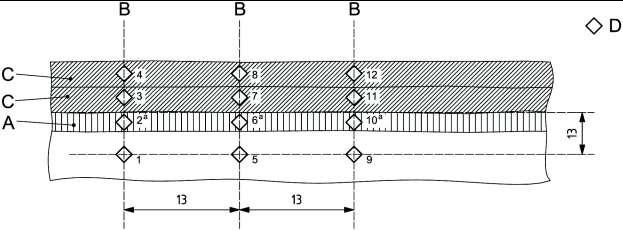
Hardness tests shall be performed at a minimum of 12 test locations distributed on three hardness traverses; in the base material. in the heat-affected zone (HAZ), and in each layer of overlay as shown in Figure 1 below (ref ISO 15156-2).
When using Vickers testing, impressions shall be made at each location on each traverse.
The indent in the HAZ (impression no. 2. 6 & 10 in Figure 1) shall be entirely within the HAZ and located a maximum of 1 mm from the fusion line.
For overlay welding of fixed components (not rotating) hardness tests shall be taken from the weld in the lowest heat input position in order to qualify for all positions (ISO 15614-1).
Location of hardness indentations as specified in ISO 15156-2 are shown in the below picture.
Acceptance criteria for hardness test for weld overlay
The hardness of parent/base metal (including HAZ) and weld metal shall meet requirements in ISO 15156-1 NACE MR 0175 for each respective material after weld overlay and any subsequent heat treatments.
The maximum acceptable hardness for carbon steel -, carbon-manganese steel – and low alloy steel base metal and HAZ for weld overlays is 250 HV.
22 HRC may be used for welding procedure qualification if the design stress does not exceed two-thirds of SMYS and the welding procedure specification includes post-weld heat treatment (ISO 15156-2 Sec 7.3.3).
Macro examination of weld overlay weld as per ISO 15614-7
1 off macro examination shall be performed. The test specimen shall be prepared and etched in accordance with ISO 17639 on one side in order to reveal clearly the fusion line, the heat-affected zone (HAZ), and the building-up of the layers.
Macro sample testing shall cover the macro exam of base metal, heat affected zone and the weld metal.
At minimum, 1 macro sample per PQR shall be tested by macroscopic examination.
Acceptance criteria for macro examination:
Cracks & other planar defects are not permitted. Individual pores >2mm are not permitted (ISO 15614-7Sec 7.5.2.1)
The macro section shall show a sound weld merging smoothly into the base material and meeting Quality level C of ISO 5817.
The macro sections shall be documented by photographs (magnification of at least 5X). Ref DNV OS F101 App C, Sec F405.
Chemical composition verification of weld overlay procedure qualification
Chemical composition verification of test weld overlay shall be according to ASM E IX – QW 453 Note 9 & API 6A sec 6.5.1.2.2.
The chemical analysis shall be sampled from the as-welded or machined surface to be qualified. The distance from the fusion line (weld interface) to where the chemistry is sampled is the minimum overlay thickness qualified.
When a 3 mm overlay is specified, the sampling position shall be a maximum of 3 mm from the fusion line.
The distance from the fusion line (weld interface) shall be recorded in the PQR. For the acceptable overlay consumables listed in section 5.4, the chemical composition shall satisfy the compositional requirements in the consumable standards listed in section 5.4.
Corrosion testing of weld overlay procedure qualification
Corrosion testing of weld overlay shall be performed when this supplemental requirement is specified.
Specimen for corrosion testing shall be a chip taken from the as-welded or machined overlay surface to be qualified.
The distance from the fusion line (weld interface) to the corrosion testing chip sampling position, is the minimum overlay thickness qualified.
When 3 mm overlay is specified. the sampling position shall be a maximum of 3 mm from the fusion line. The distance from the fusion line (weld interface) shall be recorded in the PQR.
Corrosion testing shall be carried out as per ASTM G48 Method A. The test temperature shall be 40 Deg C and the exposure time shall be a minimum of 24 hours. Cut edges shall be made as per ASTM G48.
Acceptance Criteria for corrosion test:
- No visible pitting at 20X magnification level:
- the weight loss shall not be more than 4 gram/m2.
Retesting of weld overlay procedure testing
If a specimen fails to meet the test requirements, two sets of retests, for that particular type of test. maybe performed with specimens cut from the same procedure qualification test coupon.
The results of both retest specimens shall meet the specified requirements for acceptance of the test.
