Band saw blades are susceptible to breaking and failure. When a band saw blade breaks, it can be a catastrophic event, resulting in damage to the machine and the workpiece.
If a band saw blade breaks, the first step is to restore the machine to its normal operating condition. Once the machine is restored, the next step is to replace the band saw blade.
This type of welding is often used to repair band saw blades that have been damaged. The blades are clamped in a vise, and the welders use a TIG welder or Brazing to weld the two pieces of metal together.
Brazing Kit for Band Saw Welding
The band saw blade brazing is the process of joining two metal pieces by melting a filler metal (brazing rod) between them. This can be done using a gas torch.
The main advantage of brazing over welding is that it does not require the use of an expensive welder.
Brazing is also less likely to cause distortion of the metals being joined than welding. With Brazing you don’t need annealing which is otherwise required after welding.
Below are the Items you need to do Brazing at home for Band Saw Welding:
Flux for Silver Soldering (Click here for full description)
Brazing wire-Hard Silver Soldering Wire ((Click here for full description)
One important thing to remember when brazing is to use flux. Flux helps to protect the metals from oxidation and also helps to make the joint between the metals as smooth as possible.
There are a few different types of welders on the market. The welder you choose will depend on the type of welding you need to do.
Arc welders are good for welding sheet metal. Mig welders are good for welding thicker pieces of metal. TIG welders are used for welding thin metals.
You can perform band Saw Welding using the following methods:
Brazing/ Soldering- (Recommendedmethod for home use)
Using Resistance Welding Machine
Using conventional Fusion Welding processes such as TIG Welding
When it comes to bandsaw blade welders, there are two types: manual and automatic. Manual welders require more skill to use, but they are less expensive than automatic welders. Automatic welders are more expensive, but they are easier to use and they last longer.
The price of a bandsaw blade welder varies depending on the type of welder you choose. Arc welders cost between $100 and $300.
Tig welders cost between $200 and $700. A Special-purpose Band Saw welder using resistance welding costs between $2500 to $10000.
Why Do You Need to Weld a Band Saw Blade?
There are a few reasons why you might want to weld a bandsaw blade. The first reason is that it can save you money in the long run. By welding your blade, you’ll create a more reliable and longer-lasting saw.
If your blade breaks while you’re using it, you won’t have to worry about being in an emergency situation where you don’t have a working saw.
Finally, welding your blade will also improve its cutting performance, making your projects go more smoothly.
What Do You Require to Weld a Band Saw Blade?
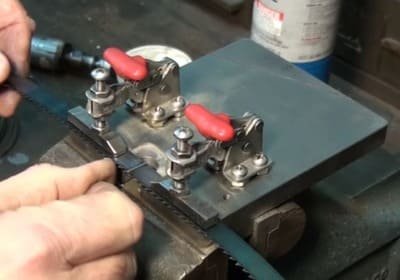
When welding a bandsaw blade, there are a few key things you need to have on hand. First and foremost, you’ll need a welding vice. This will help you securely hold the blade in place while you weld it.
You’ll also need a TIG/MIG welder or Braze welder to do the welding. Additionally, you’ll need a grinding wheel and clamping device to hold the blade in place while you grind it. Finally, you’ll need a hammer to help tighten the welds.
Steps for Welding Bandsaw Blades
Welding bandsaw blades is a process that can be used to repair a blade or to create a new one. There are several steps involved in welding bandsaw blades, and the process can be completed with a few simple tools.
The first step is to remove the old blade from the saw. This can be done by loosening the screws that hold the blade in place and pulling it out of the saw.
The next step is to measure and mark the new blade. The blade should be marked so that it is equal in width to the old blade and twice as long.
The next step is to weld the two pieces of metal together. This can be done using a welder or an oxy-acetylene brazing torch. The weld should be made on the back side of the blade so that it is not visible when the blade is installed in the saw.
1. Preparation of the blade
The first is to check the condition of the blade. This includes looking for any rust or other damage that may have occurred.
If there is any rust, it needs to be removed using a rust remover. Once the rust is gone, the blade should be cleaned with a degreaser to remove any oils or dirt.
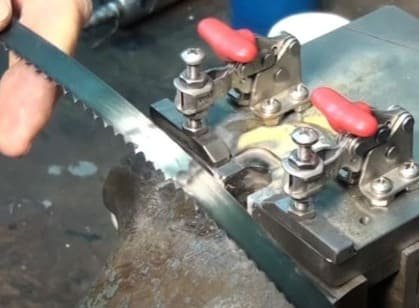
2. Grinding of the blade
Before welding, grind the Band Saw Blade edges. Make a taper cut instead of a straight cut to increase the weld area & to avoid tangential stresses in the blade welding zone.
3. Welding of the blade
Hold the blade in its position using a vice. A tight blade position during Brazing/ welding will ensure less distortion after welding.
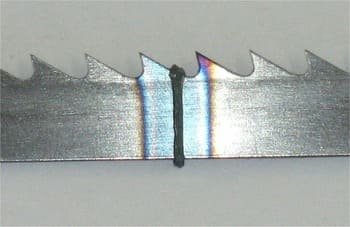
After completing the welding, grind smooth the weld to match the blade material thickness. This will ensure the least stress concentration in the welding area.
Annealing of band saw blade
annealing of the band saw blade is a critical step in the welding process. if it is not done correctly, the blade will not hold up to the demands of cutting metal. The purpose of annealing is to soften the metal and relieve residual stresses from welding.
Material Welding is run by highly experienced welding engineers, welding trainers & ASNT NDT Level III bloggers.
We strive to provide most accurate and practical knowledge in welding, metallurgy, NDT and Engineering domains.


Your article helped me a lot, thanks for the information. Do we need to apply preheat for saw blade welding?
Yes, you can use brazing for Saw blade welding.