Welding is an art that requires a combination of skill, technique, and experience. As a welder, you are constantly challenged to produce high-quality welds that meet the required specifications.
One of the most challenging welding positions is the 6G welding position. It requires careful attention to detail and a steady hand to produce a smooth and consistent weld.
In this blog post, we will share some useful tips and tricks for the 6G welding test position that can help you improve your technique and produce better welds.
Whether you are a beginner or an experienced welder, these tips will help you achieve greater success in your welding skills.
Welding Coupons Preparation
When preparing welding coupons, it’s essential to select the right material and dimensions that match the workpiece.
In this case, we will use a 6-inch diameter Sch. 80 pipe with a wall thickness of 0.432 inches.
Here are the steps to prepare welding coupons from this material:
Material selection: As mentioned, we will be using 6-inch diameter Sch. 80 pipes with a wall thickness of 0.432 inches. This material is commonly used in heavy-duty applications such as pipelines and pressure vessels.
Cutting: Using a saw or plasma cutter, cut the pipe into sections that are the desired length for your coupons. Make sure to use a straight cut and avoid any jagged edges or burrs.
Beveling: Depending on the welding process being used, the edges of the coupons may need to be beveled. In the case of the 6-inch diameter Sch. 80 pipe, a bevel of 30- 37.5 degrees on each side is recommended.
Cleaning: Before welding, it’s important to clean the coupons to ensure that they are free from any contaminants that could affect the quality of the weld. Use a wire brush or grinder to remove any rust, dirt, or debris.
Tacking: To hold the coupons in place for welding, use a tack weld at each end. Make sure that the coupons are aligned correctly and the tacks are strong enough to hold them in place.
Once the welding coupons have been prepared and tacked, the next step is to fix the piece in position for welding.
This involves using pliers and/or clamps to secure the piece with its axis at 45° to the horizontal plane. The tacks should be placed at 3, 6, 9, and 12 o’clock positions.
It’s important to note that the tack at 12 o’clock should be placed where there is the smallest root gap. This will help ensure that the root pass is properly filled and that the weld has good penetration.
Before starting the actual welding process, it’s important to check the alignment of the coupons and make any necessary adjustments.
This will help ensure that the weld is straight and meets the required specifications.
Once the piece is fixed in position and aligned, the welding process can begin.
6G Root Run Welding
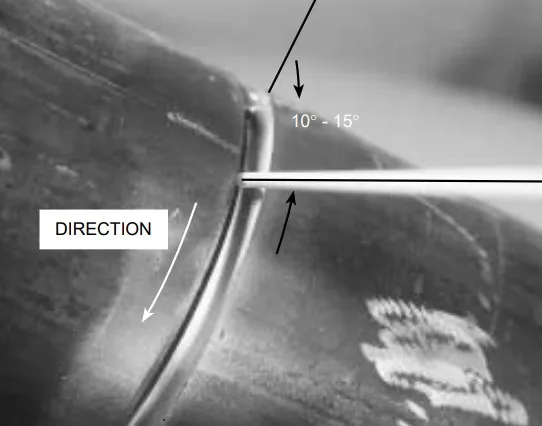
To ensure a successful root run welding, it’s crucial to follow the correct technique. Start by positioning the electrode at 12 o’clock, with a trailing angle of 10 to 15°, and make sure that the electrode is in the same plane as the joint.
It’s important to avoid starting the arc on the edge of the tack towards the external surface of the pipe and instead begin at the root of the joint.
As you start welding, push the electrode into the joint and move forward steadily, maintaining a consistent speed and arc length.
It’s important to maintain control over the electrode to avoid any jerky or sudden movements that may result in defects or imperfections in the weld.
If you notice that the electrode coating is melting in an irregular manner, don’t panic. Simply move the tip slightly from one edge to the other until the melting process is smooth and even.
When welding both halves of the joint, make sure to utilize the same technique that was used during the root bead process. Consistency is key to achieving a uniform and solid weld.
As you work, keep in mind that the bottom bead should only penetrate inside the pipe up to 1.6 mm.
Going beyond this threshold could lead to defects or other issues. So, it’s important to maintain control over the electrode and ensure that the weld is carried out precisely.
6G Position Hot Pass Welding
When beginning the hot pass, start by positioning the electrode at 12 o’clock and maintaining the same angles that were used during the bottom bead process.
Slowly move the electrode downwards towards 6 o’clock, using a gentle up-and-down motion to keep an eye on the weld pool.
As you work, it’s important to move the tip forward for a length equal to the diameter of the electrode, allowing the pool to solidify slightly.
Then, move the tip back for a length equal to half of the electrode diameter, and wait until the crater is full before moving onwards.
It’s important to keep in mind that the technique you use will vary depending on the class of steel being welded. If you’re working with 5/32″ (4.0 mm) diameter steel, start with the electrode at 12 o’clock and move it towards 6 o’clock while maintaining the same angles as the bottom bead.
6G Position Filling Passes Welding
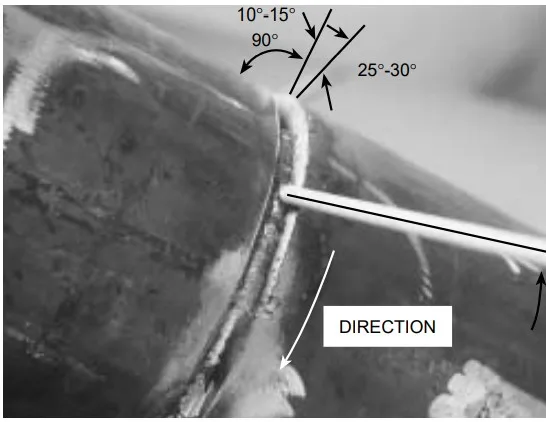
As you move on to the filling passes, make sure to start from the 12 o’clock position and maintain a work angle of 80-90° with respect to the pipe axis.
While doing so, support the sides of the seam at the top. Advance in an elongated oscillating motion from 12 o’clock to 6 o’clock, and perform leveling beads if required.
6G position Capping pass welding
To complete the welding process, perform the capping pass using the same rod angles and welding technique as used for the filling pass.
It’s important to ensure that the external pass creates a weld bead height of 1/16″ thickness and fuses the weld beveled edge up to 1/16 inches.
Weld both halves of the joint thoroughly before removing any slag or other impurities that may have formed during the welding process.
Material Welding is run by highly experienced welding engineers, welding trainers & ASNT NDT Level III bloggers.
We strive to provide most accurate and practical knowledge in welding, metallurgy, NDT and Engineering domains.


: Everything you need to know")


