What are Image Quality Indicators (IQIs) or Penetrameters, Their Selection & Placement?
In taking a radiograph, it is imperative that a standard penetrameter (also called an image quality indicator) is placed on the part being radiographed. During the radiographic testing, the use of the Image Quality Indicator (IQI) or also called Penetrameter, provides the first indication of the RT film quality by a direct comparison of the IQI image on the radiograph.
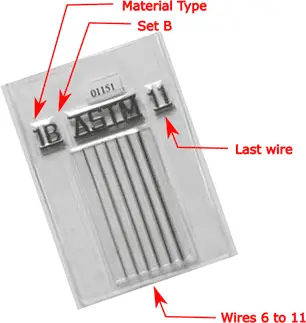
So, the IQI is used in RT to establish the RT film image quality. It is positioned on the object that has to be radiographed to evaluate the radiograph sensitivity. The Image Quality Indicator (IQI) consists of wires of varying thickness (where wire material is the same as the test piece material), which are welded into a plastic film.
The thinner the depicted wire on the radiograph, the higher the image quality level. In the USA two main types of IQI are ASTM and MIL-STD types IQI.
What is a Penetrameters?
Penetrameters are used to determine the sensitivity of the radiograph by placing it on the test piece. If you can see the smallest wire of the IQI clearly on the radiograph it means the film has the highest sensitivity.
These are made of the same material which is to be radiographed. Thus, if the penetrameter can be seen clearly on the radiograph any change in thickness of the test object (2% or more) will be seen clearly also.
What is Radiographic Sensitivity?
Radiographic sensitivity refers to the lowest or smallest thickness change that an RT film after exposure can show. It can be considered as a scale for RT image quality features connected to the smallest flaw it can exhibits. We can understand the sensitivity with the below example:
Radiography sensitivity formula (IQI Selection Formula)
Assuming an RT Film has 3% sensitivity for 12 millimeters (1/2-inches) thick material, so the smallest flaw or discontinuity which can be located will be:
0.03 x 12 = 0.36 millimeters, or 0.03 x 1/2= 0.015 inches
Sensitivity is one of the important parameters that has to be considered for radiographic testing.
Types of IQI in Radiographic Testing
Two types of Image Quality Indicators or IQI used in industries are:
- Hole Type IQI (Also called Ship type)- Consisting of three holes of different diameters & a lead number.
- Wire type IQI: Consists 6 wires of different diameters & a lead Number.
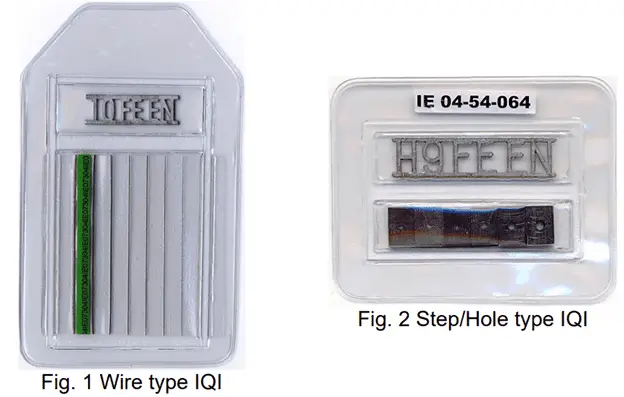
Hole Type IQI (Shim type)
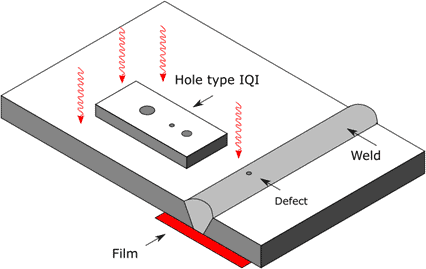
Hole type IQI has 3 different diameter holes for radiograph sensitivity check & a lead number for identification purposes on other ends. Below is an example of a Hole type IQI given for reference. The center hole is the smallest one & marked as ‘1T’ (T means IQI thickness).
The hole near the Lead Number is ‘2T’ having a diameter twice the dia of ‘1T’. The third hole is marked as ‘4T’ having a diameter 4 times of IQI thickness. Nowadays, only wire-type IQI is used in radiography testing.
Refer to ASME Section V, Table T-233.1 for Hole type IQI details such as hole diameter, IQI designation & respective thickness. Similarly, for wire type IQI, details can be found in
Wire Type IQI
There are four sets of Wire Type IQI- Set A, B, C & D. They have 6-wires of different wire diameters & their selection is based on the material thickness that has to be radiographed.
Refer to the below table for different wire type IQI details for wire diameters, and wire ID for each type set.
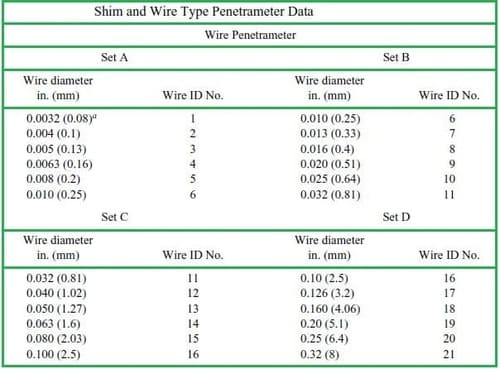
The standard wire diameters for different wire types IQ are given in the above table in mm & inches.
How do make the selection of Image Quality Indicators ( IQI)?
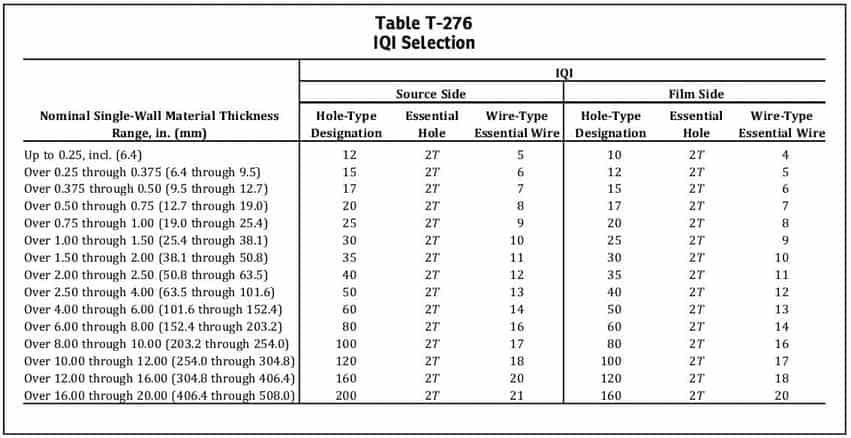
Refer to the below table for the IQI selection guide. In General, IQI selection is:
- The material of IQI shall be the same as the object material. (Refer to SE-747 for more details on material types for wire type IQI selection).
- The size of wire type IQI or hole type IQI is made based on the material thickness. Refer to below table from ASME Section -V (Table T-276) to select a different types of IQI based on the material thickness.
Guide for Placement Of IQIs
Wire-type IQI’s are placed directly on the weld (source side). They are made of the same base metal type as the base metal to be radiographed.
Different wire diameters having straight wires are used in the wire type IQI. in a Double-wall image, IQI shall be kept on the source side.
If due to any issue that prevents placing the IQI on the source side, they can be positioned on the film side too by touching to the test object. Use a lead letter ‘F’ near the IQI so it can be known that IQI was placed on the film side.
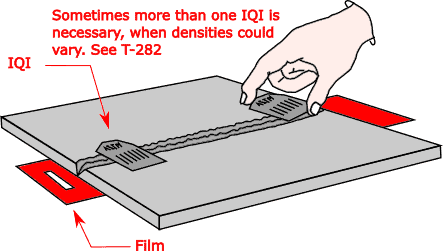
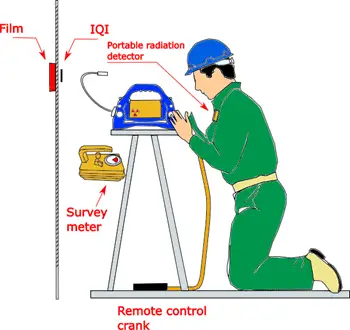
General types of IQI’s:
Of the many types of Penetrameters available, the following are the most common:
1. The German wire type: It consists of a series of seven wires of various diameters, which is standardized by a DIN standard. The ranges of wire diameter depend on the thickness of the weld being examined.
2. The API-ASME single-thickness type: It is specified for pressure vessel radiography. It is in the form of a thin strip of uniform thickness equal to 2% of the thickness of the plate to be examined.
Three holes are drilled in the strip with diameters equal to two, three, and four times the thickness of the strip, the smallest hole being not less than 1.6 mm in diameter.
3. The API-ASME stepped-type : It consists of graded steps of metal, each 12.7 mm long, and having graded thicknesses of 0.13, 0.25, 0.51, 0.76 and 1.0 mm for testing steel up to 50 mm thick, and graded thicknesses from 1.0 to 3.0 mm for steel in the 50-100 mm thickness range. Each step has a hole of 4.76 mm diameter in the center.
4. The French AFNOR type : It also consists of a series of steps of increasing thickness, each having a drilled hole or holes of diameter equal to the thickness of the step.
The image quality of the radiograph is indicated when the radiograph shows up holes or slots of some definite sire of the penetrameter used. The inspector should know the penetrameter requirements applicable to the particular fabrication he is inspecting.
Similar Posts:
