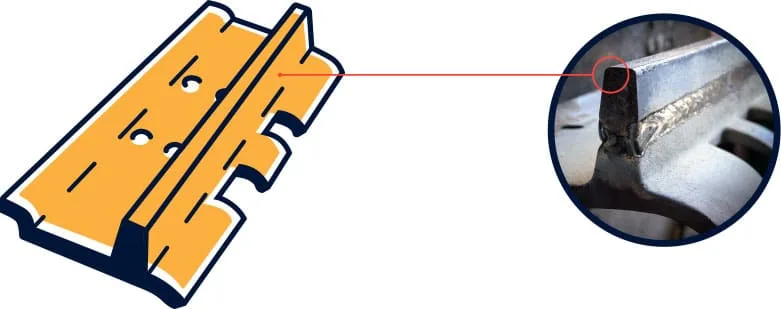
Grouser bar welding is a critical welding operation due to its application. The weld must be strong to withstand the load & operating conditions. Follow the recommended welding procedure given in this article for sound and strong grouser bar welding.
There are specific welding procedures that must be followed in order to ensure a strong weld.
This article provides an overview of the recommended welding procedure for grouser bars, as well as some tips on how to achieve a strong weld.
Materials for Grouser Bar
Grouser bars are an essential part of any tracked vehicle, and there are a few different materials that can be used to make them. There are many materials that can be used for a grouser bar.
The most common material is steel. Steel is strong and durable, making it perfect for heavy-duty applications.
Heat-treated boron is known for its resistance to wear and tear. It is also very tough, making it ideal for heavy-duty applications. However, boron can be susceptible to cracking if not used properly.
Non-Heat Treated High Carbon is strong and durable, yet still flexible enough to provide a good grip on slippery or uneven terrain. It is also resistant to wear and tear, making it ideal for use in demanding applications.
For grouser bar welding, the best options are E7018, E70-T4, and E71T-GS rods. You can use any of these available welding rods or filler wires to suit your need.
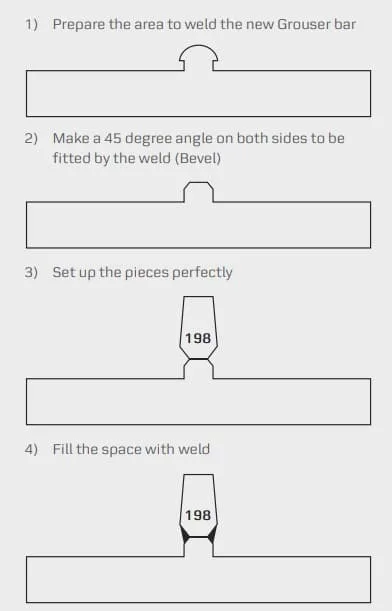
Grouser bar welding is a necessary process for your bulldozer, loader, excavators, and other tracked dozers. By following a few simple steps, you can ensure a strong, reliable weld. The grouser bar welding procedure is as follows:
1. Clean the material – using a wire brush or grinder, remove any rust, scale, or debris from the surface of the grouser bar.
2. Prepare weld bevel – create a 45-degree angle on each edge of the plate that will be welded. This will allow for full penetration of the weld by allowing welding from both sides as shown in below joint configuration.
3. Check joint alignment – ensure that the two pieces to be welded are properly aligned before proceeding with welding. Any misalignment in the joint can lead to premature failure of the load due to unidirectional loading.
4. Preheat the weld joint – using an oxy-acetylene torch, preheat the area to be welded to approximately 200- 300 degrees Fahrenheit. Higher preheating might be needed for welding high-carbon grouser bars or heat-treated boron steel.
5. Tack Welding & Full Welding: Finally, tack welding and full welding can be completed. Tack welding secures the two pieces of metal in place before completing the full weld.
Material Welding is run by highly experienced welding engineers, welding trainers & ASNT NDT Level III bloggers.
We strive to provide most accurate and practical knowledge in welding, metallurgy, NDT and Engineering domains.


")


 Steels")
