Most people have seen a welding bead while others have no clue what it is. A welding bead is simply the result of depositing filler material while welding, in order to create a weld pool and fill the weld joint.
The weld beads itself are generally deposited in three distinct parts to create a welding joint:
Root Pass,
Fill Pass, and
Capping Pass.
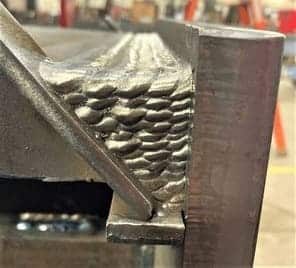
a mulitpass weld joint with multilayers weld bead deposition
Types of Welding Bead
Welding bead appearance mainly depends on welding current, electrode type and angle, welding electrode motion, welding position and speed of travel, mainly.
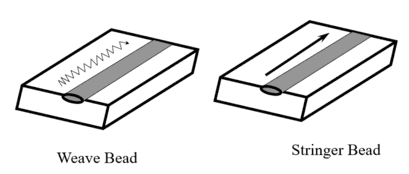
With that, there are two main types of welding bead that are commonly used, based on the appearance that is desired. They are:
1). Stringer beads: This type of welding is often used for welding thin metals together. The welder moves the torch in a straight line along the length of the metal being welded.
2). Weave beads: Weave beads are often used for welding thicker metals together. The welder moves the torch back and forth across the width of the metal being welded.
Stringer bead & weave Welding Bead
What is the Meaning of Stringer Bead?
When it comes to welding, the meaning of stringer bead is pretty simple. It’s a bead that’s been welded in a straight line with little to no electrode motion. This type of bead is typically gives good cosmetic look. They are first step to practice welding for new welding students.
The stringer bead is created by depositing filler metal onto the base metal in a linear fashion without appreciable weaving, creating a bead that looks like a string.
Stringer bead is very useful especially when welding thin materials, as too much electrode movement can cause the heat to spread out too much and potentially damage the material. In these cases, a stringer bead weld can help prevent heat from spreading beyond the desired area.
Push & Drag Technique with Stringer Bead
The drag technique is best for welding thick materials, as it uses a lot of pressure to fuse the metals together.
The push technique is better for welding thin materials, as it uses less pressure and can create a more precise weld.
Knowing which welding technique to use is important for getting the best results possible. If you are working with thick materials, the drag technique is usually the best option. If you are working with thin materials, the push technique is usually the better choice.
Advantages of Stringer Beads
Stringer bead gives faster travel speed.
Stringer bead result in low welding heat input.
These beads provide good aesthetic look.
Stringer beads are used for root run welding as they gives deeper weld penetration in open root.
What is Weave/ Weaving Bead in Welding?
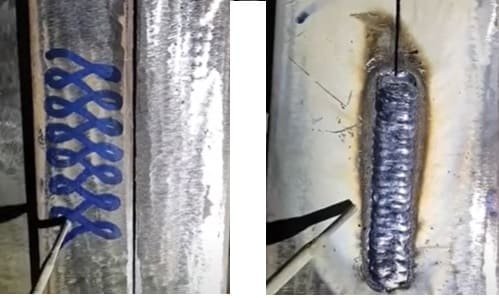
In weaving welding torch or electrode is oscillated transverse to the weld direction as it progresses along the welding path.
Weaving in welding is a technique where the welder moves the torch in a side-to-side motion while simultaneously moving the torch forward.
Weld weaving technique (letter 8) example
This creates a crisscross pattern that helps to evenly distribute the heat and provide good weld penetration and fusion. Weaving width is generally restricted to maximum 3 times of electrode diameter in Stick welding (SMAW) or 5/8-inches (15 mm) with TIG, MIG & FCAW Welding to control the welding heat input.
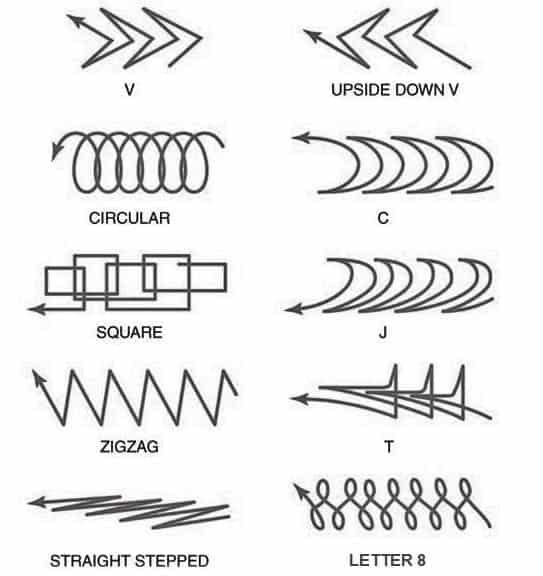
There are different weaving techniques and welders use their personal choice to use them. The most common weaving techniques are:
V- type weaving technique: For vertical & flat welding.
Upside down V- type weaving technique: For vertical & flat welding.
Circular – type weaving technique: For flat position & weld built up applications.
C– type weaving technique: Good for flat & vertical welding.
Square- type weaving technique: For vertical welding
J- type weaving technique: For welding in Flat, horizontal & vertical lap joints.
Zig Zag– type weaving technique: Cover pass in Flat & vertical welding positions
T– type weaving technique: For Fillet welds in vertical and overhead positions.
Straight stepped – type weaving technique: For root pass, stringer beads and multipass welds.
Figure 8– type weaving technique: Cover pass in Flat & vertical welding positions.
Different welding weaving techniques
Stringer Bead vs Weave Bead
There are two main types of bead welding: stringer and weave. Stringer bead welding is when the welder lays down a continuous bead in a linear fashion.
Weave bead welding is when the welder lays down a series of overlapping beads that resemble a weaving pattern.
So, what’s the difference between the two? For one, stringer bead welds are typically result in low welding heat input and good for root run welding, thin sheet metal welding and multipass capping.
Weave bead welds are more aesthetically pleasing since they have a more even appearance with wider ripples. They are good for fill passes as well as cover/cap pass. Weaving beads are not used for open root run welding as this can result in burn-through and lack of penetration.
Stringer bead welding is best suited for thin materials while weave bead welding works better on thicker materials. Ultimately, it comes down to personal preference and the type of welding job you’re working on as to which method you choose.
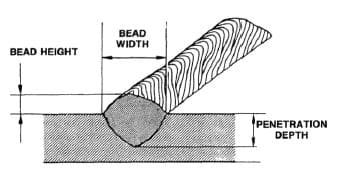
What does a Good Weld Bead look like?
A good weld bead should be uniform in weld ripple placement and have a smooth, consistent appearance. The weld bead should be free of any welding defects, such as pores or cracks, with no over or under welding.
The edges of the bead should be well defined, and there should be no spatter or slag on the surface. A properly welded bead will have a shiny, metallic appearance. It should also be well-adhered to the base metal resulting a low weld reinforcement angle.
A good weld bead will have a rounded cross-section and will be slightly concave in shape. The width of the weld bead should be approximately half the thickness of the base metal as a thump rule.
The above guidelines are just a few of the many factors that must be considered when judging the quality of a weld bead. However, if a weld bead meets all of these criteria, it is likely to be strong and durable.
Bead Weld Symbol
Bead Weld Symbol is a non-standard term used for welding symbols. A weld bead can be placed on any type of welding joint and the for a welding symbol, joint type is the deciding factor.
So a weld symbol is not the correct term and instead it should be called by welding joint symbol based on the type of joint. E.g., a Fillet Weld Symbol or a Groove Weld Symbol.
A weld bead is a continuous, localized deposit of weld metal that is produced during welding. A weld pass is a layer of weld metal that has been deposited in a single pass of the welding torch.
The main difference between weld beads and weld passes is that weld beads are produced by welding in multiple passes, while weld passes are produced by welding in a single pass (one weld pass can be formed by multiple weld beads).
Difference between Weld Pool and Weld Bead
When it comes to welding, there is a big difference between the weld pool and the weld bead. The weld pool is the molten area where the filler material and base metal meet due to heat created by welding arc.
The weld bead is the cooled and hardened area that forms after the welding process is complete.
The size of the weld pool depends on several factors, including the type of welding process being used, the size of the electrode, and the amount of current being used. The size of the weld bead will also depend on these same factors. In general, however, the weld pool will be much larger than the weld bead (as molten metal takes higher volume than solid metal).
The purpose of the weld pool is to provide a space for the filler material to flow into and form a bond & fuse with the base metal. The weld bead, on the other hand, serves as a reinforcement for that bond.
In stick welding, the electrode is a long, thin metal rod with a coating of flux. The flux burns away as the electrode is consumed, leaving a bead of molten metal. The welder must maintain a consistent arc length and welding speed to produce a smooth, even bead.
The string or linear bead is perhaps the most common type of stick welding bead. It is produced by maintaining a consistent arc length and welding speed. This type of bead is well-suited for most general purpose applications.
There are four main types of stick welding beads placement positions:
Flat,
Horizontal,
Vertical.
Overhead.
MIG Welding Bead Example
A mig welding bead is the result of the filler metal and base metal melting together to form a strong bond. The width, depth, and shape of the bead are determined by the welder’s technique.
There are three main types of mig welding beads: string, stacked, and weave.
String beads are formed by moving the gun in a straight line at a consistent speed. Stacked beads are created by overlapping string beads.
Weave beads are made by moving the gun side-to-side as well as forward and backward.
TIG Welding Beads Examples
A well-executed TIG welding bead should be smooth and have a consistent width throughout its length. The bead should also be placed in the center of the joint, which can be difficult to do if you’re not experienced with welding.
If you’re just starting out with TIG welding, practice on some scrap metal before you attempt to weld a bead on a project. Pay attention to your travel speed and electrode angle, as these will affect the appearance of your bead.
Whether you’re a welder or not, you’ve probably seen a TIG welding bead. It’s that line of weld metal that looks like it was woven together.
And, in a sense, it is. The process is called weaving, and it’s done by moving the welding torch in a side-to-side motion while feeding filler metal into the weld joint.
Weaving is often used for cosmetic reasons, to give the weld a nice, finished look.
Material Welding is run by highly experienced welding engineers, welding trainers & ASNT NDT Level III bloggers.
We strive to provide most accurate and practical knowledge in welding, metallurgy, NDT and Engineering domains.